Showing posts with label Tools of the Trade. Show all posts

1.20.2012

Sew Awesome | Things I've Learned #1


Remember how I mentioned in my new year resolutions that I was going to be more honest about the times I've screwed up? Well here you go. I'm going to be honest and fess up to the fact that I totally took the easy way out (mostly for financial reasons) on a project, and the lesson learned.

Lesson #1: Use the type of fabric called for in your pattern!


I needed a new purse, and I had a brand new sewing machine, so I decided to conquer this lovely pattern offered by Sew Mama Sew. (I hope a few of you decide to also make the purse this instant; it's quite a great organizer and stuff-holder.) Although the pattern clearly specifies mid-weight home decor fabric, I decided that I really wanted the cheaper cost and pattern availability afforded by quilting-quality cotton. You know, the stuff found in 90% of Wal-Mart's fabric selection or the first ten aisles at JoAnn's.  I realized fairly quickly that this substitution would give my bag a much less rigid shape than the models in the instructions, but I couldn't turn back at that point.

Unfortunately, after about three months of use, my handles just weren't cutting it. The seams had torn open at the point where my shoulder supports the bag, and all the nastiness of the stabilizer (and the paper backing I had forgotten to remove) were spilling out. It was a mess, to say the least. So I picked up my shattered pride, bought a single foot of solid black home decor fabric, and redid my shoulder straps. I've got a lot of hope for these babies. Not only are they thicker and more durable, but if they do start to rag, the fabric is dyed black the whole way through, so I won't be showing off the ugly wrong side of the straps to anyone.


So let this be a lesson to all you short-cutters out there. Sometimes, you just need to buck up and buy the correct (sometimes more expensive) fabric to get a piece that will really work!

1.18.2012

Spin-a-Yarn | Let's Learn to Knit & Crochet!

After posting about my slouchy beanie here, I was so excited to hear that several of you would like to learn to knit and crochet. Well guess what? I can totally deliver!


I am going to start the Spin-a-Yarn Knit and Crochet School, and YOU can be enrolled!All you have to do is check my blog every week on Wednesdays to learn something cool and new about working with yarn. I would love it so much if you were vocal and let me know specific things you're interested in learning. For example, go "Hey, I saw this cool sweater- how do they do this pattern?" or "Holy cow, how do I know if I want to knit a project or crochet it?" Speak your minds, friends! 

To start off our school on the right foot, I'm going to do a little variation on a "Tools of the Trade" post about yarn, needles, and hooks.


YARN

There are so, so many options available anymore. Synthetic or natural. Wild, fringe-y, poofy, or plain. Thick or thin. Most patterns will only specify the needle/hook sizes for the project, but if you're in-the-know, this also tells you what size of yarn to use. If you check the handy little label on the back of your skein of yarn ("skein" is the official word for a ball of yarn), it gives you all sorts of important information. Here are the main things to check:

1 | DYE LOT: Imagine that every time yarn is made, a huge colorless batch is dumped in this big vat and all dyed together. The next batch is meant to be the exact same color, but perhaps that second batch has one extra drop of dye added. Imagine how devastated  you would be to complete a project with two skeins of yarn that end up being the slightest shade different from each other because they were dyed in different batches. Bum-freakin-tastic. to prevent you from having this problem, yarn labels will show a number know as the "dye lot". As long as all of the skeins you pick share a dye lot, you should be worry-free. 

2 | NEEDLE/HOOK SIZE: Don't worry, in just a moment I'll share with you a few details about how to pick a needle or hook for your project. For right now, just know that the label on a skein of yarn shows the appropriate needle or hook size for your project. The recommended size isn't a rule; in fact, you probably have 2 sizes of wiggle room either direction. Say the label suggests a size 7 needle; you should be able to get away with needle sizes from 5 to 9 and be in good shape. 

3 | GAUGE: I've never really had the opportunity or reason to use a gauge guide on a skein of yarn. It is probably the most helpful if you want to create your own pattern and you need to figure out how many stitches will give you 10" by 14", for instance. (When I create my own patterns I usually just start going and measure as I go.)

4 | CARE INSTRUCTIONS: Let's be honest, I don't think I've ever had occasion to wash one of my projects. (Does that make me a gross bum? Perhaps.) But if you feel like washing or generally "caring" for your projects, keep these labels in a little box in your laundry room so you can do so appropriately.  


NEEDLES AND HOOKS

First off, do you know which tool goes with which yarn technique? Knitting uses two needles and works back and forth (typically). Crocheting uses a single hook and always goes a single direction (the piece may be rotated or flipped backwards, but you'll keep working in the same direction the entire time). Picking a needle or hook is really pretty simple, with two primary factors to keep in mind.

1 | SIZE: Like I said before, the size of needle you will need is always shown in the pattern, so it should be a no-brainer. I also said before, that you usually have 2 sizes of wiggle-room (in case you want to add some flair to your project). Just beware that substituting a different needle size WILL effect the dimensions of your finished product. 

2 | MATERIAL: Your basic options are metal, plastic, and wood. Material choice is 100% based on your preference. Wood is a good eco-friendly choice. Metal is smooth, which makes it quick to move yarn back and forth from needle to needle (which makes a project go quickly). Plastic will stick to yarn a tiny bit, which is nice for beginners so you don't accidentally drop stitches. 

There are also some specialized tools, like circular knitting needles, double-ended knitting needles, or crochet hooks with a flat bottom to hold stitches. Don't worry- I'm only going to show you basics of knitting and crocheting for now that don't require those special tools. 

EXTRAS

I'm a hard-core yarn-user, but of these extras I only use a stitch guide book and yarn needle. However, if you want to stock up, more power to you. 

1 | STITCH GUIDE BOOK: If your local yarn store has a small booklet on knitting or crochet stitches (which should really only cost about $5) then get it! These books have pictures and written instructions, and make a great informational accessory for your yarn bag. I refer to my crochet guide for every single project I do. 

2 | STITCH COUNTER: This is a little clicker that literally allows  you to count your stitches. If you're working a piece with a lot of stitches (like a blanket or large clothing piece) it can be helpful to count your stitches to create different patterns. (I usually just count manually, though.)

3 | STITCH MARKERS: These little rings can loosely loop around a knitting needle and mark where you started or ended a pattern. Again, I just count manually, but perhaps these markers would make life easier. 

4 | YARN NEEDLE: A lot of projects require you to make multiple separate pieces and then join them together, a job which requires a very large needle. Don't loose these suckers. 

I sure hope I didn't overwhelm you with all this information, but it's what you need to know to get this crazy adventure started! I'm so excited to teach you all a few fun things about knitting and crocheting. Let me know what you're particularly hoping to see!

12.24.2011

Craft Confessions | Last-Minute Gift Wrap

Merry Christmas Eve, everyone! (And happy fifth day of Hanukkah to any Jewish friends who may read this!) In all the hurry, you may have forgotten to dedicate proper time, supplies, and energy to gift wrap. Never fear! Go simple and easy, and follow some of the tips from my Wrap Like a Thug tutorial. Don't worry about having the perfect, rudolf-bedazzled wrapping paper. Just have fun and go crazy with ribbon, labels, or whatever else you have laying around.

Here's what I've been feeling this year:

This is how we wrapped cookies for our neighbor.
And a few gifts for our family!
Above all, remember the best gift we could ever receive:


Merry Christmas and God Bless!

11.28.2011

Tools of the Trade | Glue Adhesives

Glue seems like no big deal, right? Wrong! I've tried on way too many projects to use a glue that just wasn't right, and I paid for it later. I'm going to tell you right now, hot glue is so much more than a crafter's crack- it is capable of a lot!


1 | TACKY GLUE: This glue is a thick white cream that takes a while to dry, but it forms a really good bond. I've seen a lot of classmates use it to build wood models, but I'm more of a fan of using Elmer's. I prefer tacky glue for projects that include fabric but don't need to be sewn. I upholstered an old bench once, and I combined tacky glue with the staples to give my wrapped fabric a super strong bond.

2 | GLUE STICK: Glue sticks work well for paper on paper, and that's about the extent of it. The nice thing about this glue is that it doesn't create the ridges that you can get when you use white glue to attach paper to paper, so it has its perks. Also, it's about the cleanest glue you can get for the kiddos.

3 | SUPER GLUE: There's a reason it's called "super". It can attach all kinds of inorganic materials that refuse to stick with white glue. In architectural models, it's great for attaching two different materials, like wood to acrylic, or metal to acrylic, or any other odd combination. Of course, it has lots of around-the-house functions. I even used it to repair my broken retainer (I live a state away from my orthodontist so sometimes I have to get creative, don't tell on me).

4 | GLUE STICKS: I'm not sure why I labeled this separate from the glue gun, but I suppose it's good to point out that it's best to keep a good stock of sticks on hand and buy the correct size for your glue gun.

5 | TAPE RUNNER: This may be slightly mis-categorized since I plan on doing a "Tape" issue of "Tools of the Trade", but ignore that for now. This tape is pretty similar in use and scope to glue sticks, and the ergonomic shape of the casing makes it really comfortable. However, I often run into the issue where I don't keep constant pressure and the tape doesn't always come off the tip, which is a bummer.

6 | HOT GLUE: I called it the crack of crafters; enough said. Oh, you want to know more? Well it attaches paper, wood, and fabric with ease. It can attach plastic and metal, but you have to be smarter than the glue to work with those materials. The glue basically works by squeezing into every crack and crevice of the material and then hardening, which is why it's so awesome at grabbing onto porous materials. Since plastics and metals are so smooth, they don't give anything for the glue to grab unless they have an unusual texture or a nob the glue can wrap around. So if you can create a textured surface for the glue to hold, you're in business!

7 | ELMER'S WHITE GLUE: The reason I specify Elmer's brand is because most of their glues are archival quality. This means if you use it to glue something you want to keep around for a long time (like things in a scrapbook) this glue won't destroy your pictures or papers like some other glues might. White glue is great for paper, wood, and fabric. It dries clear and can be smoothed out to leave little to no trace. It can also be mixed with water to get a thinner consistency which creates a lot of flexibility. I use Elmer's for every single model I build. I would be lost without it.

SPRAY ADHESIVE: This glue comes in handy the most when I'm putting together presentations, specifically attaching layouts and pictures to foam-core backing. As far as I know, that's basically all it's meant for, but it does it's job really well. It is speedy to apply, covers a lot of area, and leaves no bumps or ripples.

WOOD GLUE: As the name suggests, this is ideal for wood-on-wood attachment. After spreading on a very thin layer to the attaching surface, the two pieces must be clamped tightly together and allowed to dry completely. After the glue has cured, those two pieces of wood will be as strong as one piece, and can be sanded and cut as one object. The one downside to this glue is that is leaves yellow stain on the wood, so it's best to plan on sanding off excess glue and/or treating the wood after the project is done.

Hope this information sticks with you! (I'm so funny, I know.)

10.12.2011

Tools of the Trade | Wrap Like a Thug

What a deceiving title! I am possibly the furthest thing from a thug, but I can pretend, right?

Regardless of the chance that I may let you down with the rest of this post, I should announce that I'm teaching you how to wrap--as in gift wrap. Didn't your heart just skip a beat in eager anticipation? No? Well perhaps your heart will when I tell you cheap gift-wrapping is super easy to do, and you can dress it up or down to your heart's content. The last time I purchased regular wrapping paper was at least three years ago, and I intend to keep it that way. Here are some awesome ways to re-use materials you already have around the house.


MAGAZINE PAGES: "But they're too small to cover any gifts I'm giving!" Hold on just one second, big spender. Besides the possible need to reevaluate some of your gift-giving habits, remember that papers can be bound together, especially via needle and thread. Cut sheets out of a magazine that relates to the gift (a fashion magazine for clothing, perhaps) and use a zig-zag stitch to quickly connect a quilt-like spread of wrapping. You don't have to feel guilty about throwing away old magazines and your receiver may find a few cute outfit ideas on your gift packaging. 

FABRIC SCRAPS: Similar to the magazine method listed above, random scraps can be pieced together to create a gift bag for any shape or size of gift. If you have the time and fabric on hand, you could even make a slightly nicer bag with the intent that the bag can be reused over and over to pass gifts around. Imagine all the time and money you could save with one go-to gift bag!

BROWN MASKING PAPER: If you search around my blog, you will see that I'm nearly as addicted to this stuff as I am to acrylic paints. I bought a 180-ft roll last year as a wrapping-paper alternative, but I keep finding new applications for it everyday (think small project drop cloth, vintage label paper, and doodle paper). I'm only half-way through this roll, and it only cost $3.  When I'm in a rush, I wrap it like normal wrapping paper and tie the package in twine or jute, and it looks very rustic-chic. When I have a little more time, or a theme in mind, I get out markers, stamps, or scrapbook decorations to dress the paper up. The main idea here is that you simply can't mess up with this guy. He's your man.  

CARDBOARD BOXES: When I was a kid, my parents would always wrap our oddly-shaped gifts in whatever random box they found in the nearest trash can. Every year we'd still giggle as we opened our gifts and say, "gee, thanks for the frozen chicken cordon bleu/box of checks/tennis shoes" and feign amazement when we opened the box to reveal another, more child-friendly gift. Why not take this idea up one notch with some spray paint? For Christmas, you could purchase some metallic spray paints and spray random cardboard boxes for a picturesque array of gift-hiders under your tree. Sounds enchanting, no?

Obviously, there are plenty of other ways to get creative with your gift-wrapping choices. Just don't let The Man tell you that it costs $15 a roll to wrap your presents the right way. You tell him that you already spent plenty on the gift inside and you'd like to forego splurging on wrapping that will visit the trash can in five minutes, thank you sir!

9.30.2011

Tools of the Trade | Paints

I have a confession when it comes to paint. I use acrylic for everything. I use it to paint wood, clothing, canvas, paper, and almost anything else you might imagine.  The great thing is, it generally works well on every surface I've tried.  However, there are a lot of better paints for various jobs, so let me fill you in.


1 | SPRAY PAINT: Most avid crafters will admit to a passionate affair with spray paints. These paints score fairly high in the awesome department for a few reasons. First, spray paints don't require brushes, meaning less supplies to buy, quick application, and no brush marks on the finished product. Second, spray paints allow you to exponentially up your "thug-ness" as you conquer your inner graffiti artist. (Let's pause for a moment and dream we could all have that kind of mad skill. One day I will.) I'm saddened to encourage this behavior, but for those scared by excessive creativity, spray paint doesn't require mixing or many design choices. On the down side, my fingers hurt for days after any spray paint project, regardless of how I hold the can, and then I get awful drips from the excessive sprays as I rush to finish painting. Spray paint also puts off a lot of fumes so it's best to do in a spray booth.

2 | PAINT PALETTE: For acrylics and watercolors, this is a must. It gives you space to mix custom colors and lets you keep multiple colors right at your fingertips. This one's pretty dirty, but I kind of like it that way; it makes it looks like I'm a really intense artist, right?

3 | WATERCOLOR: Watercolor is a difficult medium, but if you can conquer it you won't be disappointed with the results. When purchasing these, skip the rectangular tray filled with hard paint medallions. We're not in kindergarten anymore. Instead, look for small tubes that allow you much more freedom to mix and get your painting groove on. The tubes may seem small and a waste of money, but remember you'll still be mixing lots of water into the paints so those tiny tubes really go a long way. Generally, you only want to watercolor on paper that is designated for that purpose. Otherwise, your project paper will get all sorts of bumps and lumps and look like an old lady. Save yourself the tears and get the right paper from the start.

4, 5, 6 | ACRYLIC: Like I said, I use it on everything. It's a water-based paint, which means if you catch a spill quickly you can remove it from porous materials (like clothing you didn't mean to paint) and your paintbrushes with water. Depending on your project needs, prices can range from the super-cheap, student quality paint, to more expensive brands for experts. Unless you have a very specific project in mind, I would suggest stocking up on large tubes in a medium quality of red, blue, yellow, black, white, and brown. It may seem intimidating to mix your own colors from there, but once you push yourself you'll unleash a whole new creative animal! If you mess up horribly, wait for the paint to dry and you can begin anew right on top of your first try. Also, don't get too worried over the difference between craft acrylics and artistic acrylics. They essentially all do the same thing, and price-wise it's often a tie between which variety is cheapest.

7 | WOOD STAIN: This isn't technically a paint, but consider using it on your next wood project. Stains allow you to change the appearance of wood while maintaining the intricate detail of natural wood grain and stained woods tend to go well with most decorating schemes. If you do choose this path, be sure to stock up on gloves (if you stain your hands they're staying that way for at least a week), a cheap, disposable paint brush, lots of rags to apply the stain, and consider a mask if fumes tend to bother you. This method also takes time as you should allow the layers of stain to dry between applications.

OIL PAINT: I had the privilege of studying oil paints for a short time under my great-grandma, and the aromatic medley of oils and paint thinner will forever bring me nostalgic happiness. Like watercolors, these paints can be difficult to master, but you will feel like you've reached "the top" if you can conquer oils. Oils do require patience, as they sometimes take several days to dry. This can be a perk, however, as it allows you to constantly mold your colors around one another, much like a sculptor reworks clay every day. Oils look great in finished work, with sculpted edges following your brush strokes and the capacity for amazingly vibrant colors.

FABRIC PAINT: I'm honestly not too fond of these paints. I think acrylics generally accomplish the same thing, and I tend to associate puffy fabric paints with 90's applique sweatshirts. It's not an era of clothing I really want to remember. If you insist on purchasing fabric paints though, I've heard that Tulip offers the best selection of varieties and colors.

There isn't always a "right" paint for every project, so don't be discouraged if you don't know where to start. Explore and struggle a little bit, and you'll ultimately be satisfied with what you've learned along the way, whether your project was a success or a painful memory pushed to the back of your mind. If you'd like some advice before starting a project, leave me a comment and I'll let you know what I think!

9.26.2011

Tools of the Trade | Paintbrushes

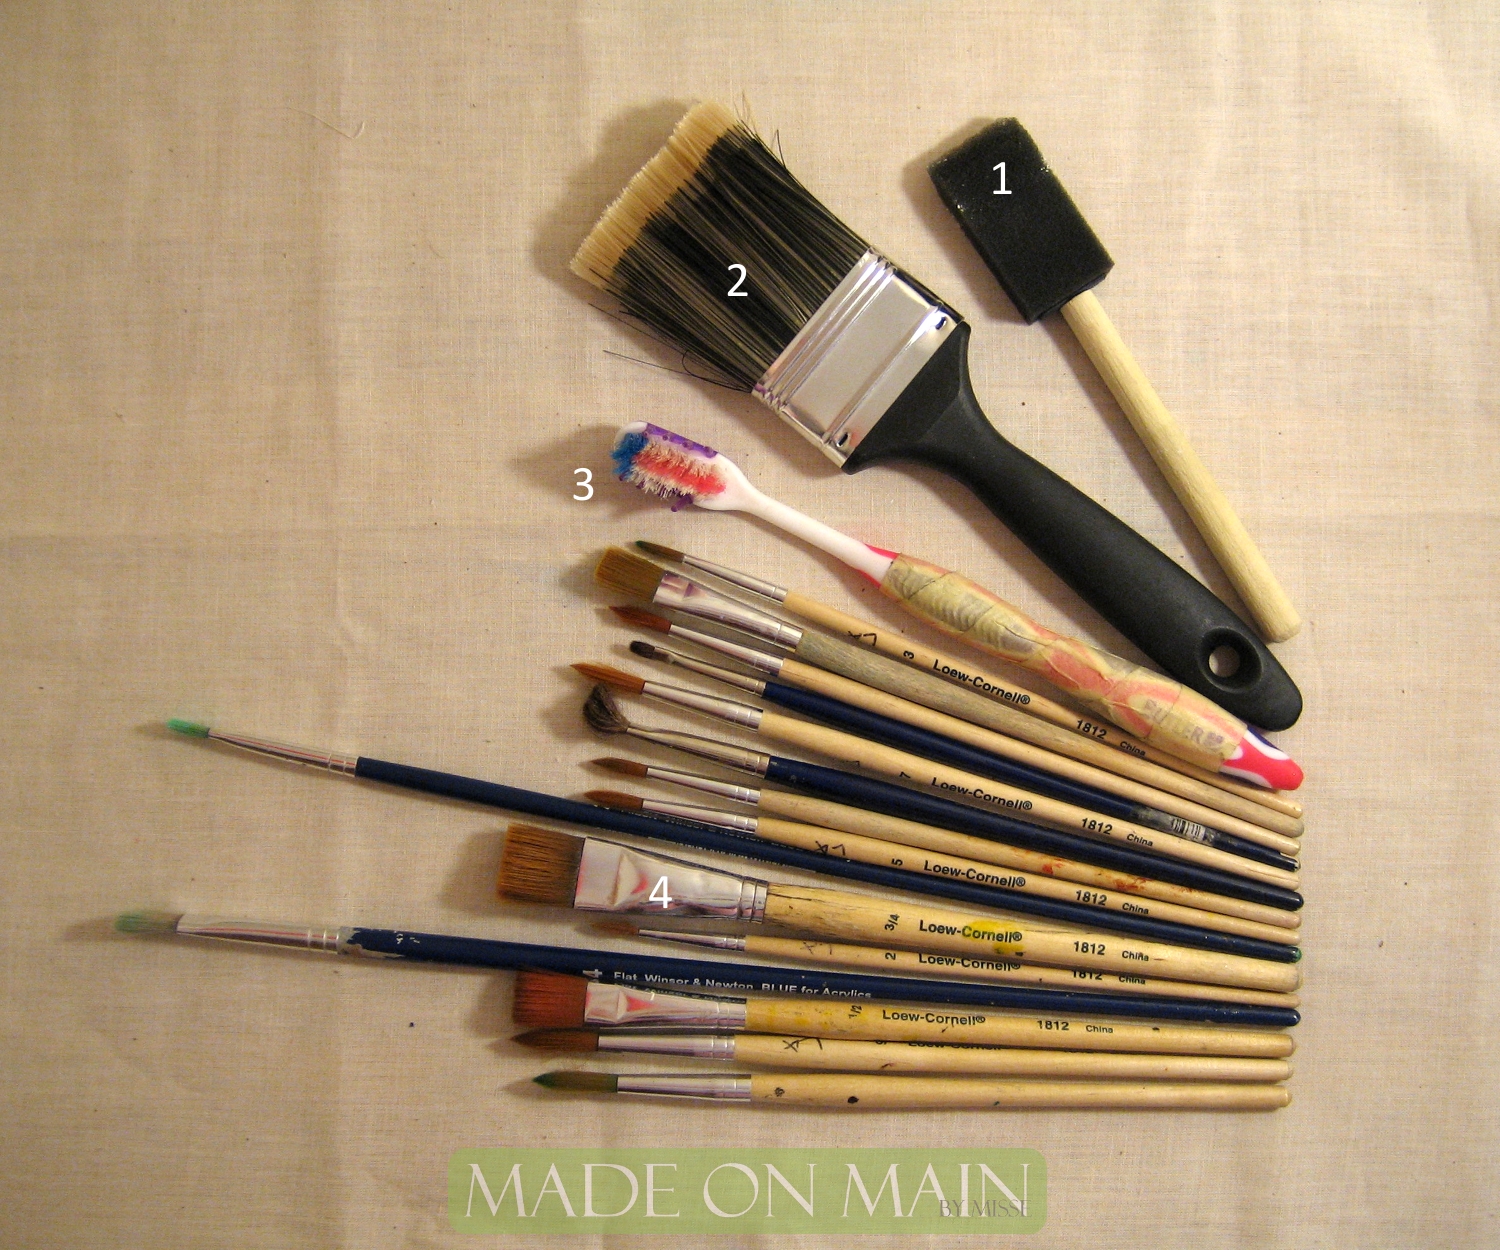
Sometimes the difference between being a paint-covered mess and the next up-and-coming artist lies in the brushes you choose.  This difference is especially important as you jump between crafting and creating art pieces.  I won't pretend to be an expert on brushes, but here are my words of advice after years of playing around with various paints.


1 | SPONGE BRUSH: The great thing about these brushes is their cheapness (I found a bag of about 10 brushes at the dollar store) and their ability to soak up excessive amounts of paint.  These brushes are stellar for stencil work, especially on super absorbent surfaces like fabric.  However, Picasso wouldn't be caught dead with a sponge brush.  Don't plan on having a great deal of control or accuracy with these brushes (hence the reason they work well with stencils).

2 | HOME IMPROVEMENT PAINT BRUSH: This is the standard brush you buy at a home improvement store to paint or stain furniture or walls.  When it comes to crafting, I recommend looking for something fairly stiff, about two or three inches wide, and as cheap as possible.  Again, I recently found a package of three of these brushes at the dollar store.  If you want to paint your walls, ignore everything I suggest here.  However, if you want to add a worn look to a piece or create distinguished brush strokes in your project, these brushes are good for "quick and dirty" work.

3 | TOOTHBRUSH: Did I surprise you?  Amazingly enough I've used an old toothbrush just as much in my art works as my crafts.  I use the brush to splash watercolors and watered-down acrylics in a controlled way.  The spread of a good flick is usually a 5" diameter, and it's really easy to aim so you don't end up with messy splatters everywhere.

4 | ART BRUSH (a.k.a. THE REAL DEAL): I could write 100 posts on the multitude of brushes available in this category, but I'll spare your eyes and brain. Most of my projects use acrylic, which I'll praise a bit in a future post, so I stock up on semi stiff brushes in a variety of sizes and shapes.  Flat brushes are best for filling in large areas (my favorite is a 3/4" brush), and I prefer small rounded brushes for detail (I have sizes 3-9 and they all get a bit of use). If watercolor is more your cup-of-tea, I suggest softer brushes that can soak up the watery paints well.

Obviously, lots of paintbrushes exist in the world, and I wish I could try them all, but I simply haven't.  If you have any tips to contribute or questions to elaborate on my suggestions, comment away!