Showing posts with label Sewing. Show all posts

1.01.2013

Sew Awesome | FLOUR SACK TOWEL PILLOWCASE


I don't understand why pillows and slip covers are so over-priced. It doesn't make sense when you can make a pillow cover for about $2. In case you'd like to give it a go, here's how I created a simple white slip cover for a pillow!

I bought a couple of flour sack towels from Wal-Mart, which cost about $1 each. I cut off one long side and reattached it so the towel would be more of a long rectangle than a square. I used some of the scraps to make loops that would hook around the button closures. I sewed the closures onto one short end of the rectangles. I then folded the rectangle around to form a square that was overlapped on one side and sewed both sides closed. Once I flipped it right-side-out, I marked where the loops reached and then sewed a button onto each of those locations. I stuffed a pillow form in the cover and extended the loops over the buttons to close the whole packet. It was a super quick and easy project, and it looks great thrown on a chair!


10.26.2012

Sew Awesome | SIMPLE VALANCE


Remember when I showed you these easy peasy drapes here a month ago? Well if that wasn't quite challenging enough for you, I've got a valance you can sew for your smaller windows. I sewed all my window coverings at once, so I may have taken the easy way out and repeated a few pictures (sorry, folks). Ninety percent of this design came from Sarah and Cozy.Cottage.Cute in this post. (Her decorating tastes are really similar to mine, so I totally creep on her blog all the time.) I just made a few changes to hopefully streamline the sewing process and add some versatility.


Start with a single length of 36" wide muslin and 2 simple buttons. You will need two 3" wide strips of the muslin, plus a large rectangle to cover the window. The measurement of the large rectangle varies depending on your window length, but if you add 6-8" to the length of your window you should be in good shape.


1. With each 3" strip, fold in half and press. Then fold the rough edges under about 1/2" and press again.

2. Pin together the strip edges that you just pressed.

3. Sew a tight stitch along both long edges. Fold ONE end (on each strip) under twice and sew another tight edge. Create a button hole in that same end of each strip. Put the strips aside for later.


4. On the large rectangle piece, fold both rough edges over 1" and press.

5. Fold those same edges over once more and press.

6. Pin and sew along each edge.


7. This step depends on the thickness or radius of the rod on which you plan to hang your valance. Mine was a standard aluminum flat rod (probably the cheapest thing you can get) that the last tenants left behind. To fit this rod in the valance pocket, I folded the top half over about 3 inches. Place the two strips just under the folded-over lip with button holes facing DOWN or AWAY FROM THE POCKET (it would be a shame to hide away all that good work). Run one last seam over the folded over edge to create a pocket.

8. This part is tricky to describe, but important to grasp to sew your buttons correctly. In image 7, the side I show is actually the back side of the valance (the side that will face the world outside your house), and the side where you just sewed the pocked edge down. The side on the ground in image 7 is the front side, and the side where you will sew on both buttons. Sew these buttons directly opposite where the strips connect to the pocket.

To hang your valance, simply thread a curtain rod through the pocket. Roll or fold excess fabric up and pull the strips from the back to the front, attaching to the front of the panel via the buttons.

P.S. Notice how my buttons mysteriously changed colors? I have another tutorial headed your way in a few days on a really cheap faux antique metal technique that I used here!

8.24.2012

Mod Bod | BOOT SOCKS FROM STOCKINGS


For my birthday and Christmas last year, my mother-in-law gifted me two adorable pairs of boots, and I cannot wait until the weather cools down enough to wear them again this year. However, I did realize last year that wearing the boots without stockings or tucked in pants could get really uncomfortable, and even chafe my calf pretty badly behind the seams. Instead of discarding a pretty beat up pair of stockings, I decided to refashion them into boot socks!


The steps were pretty easy, here's what I did:

1) Cut stocking ends to remove holes (for me this meant cutting where the previous ankle was)
2) Close end with zig-zag stitch
3) Try on stocking with boots to determine length of sock, add 3/4 inch to this measurement and cut stocking here. Turn each remaining sock inside out.
4) Cut open top waistband of stockings, remove elastic band and cut into two equal pieces
5) Close each piece of elastic into loop with straight stitch.
6) Situate each elastic loop around the top of one sock, 1 inch away from the edge. Fold excess sock over and pin in place.
7) Sew around the folded over edges with zig-zag stitch, being careful not to sew through elastic
8) Try on new socks with boots, perhaps showing off not-so-awesome booty in pictures (see top of post-sorry about that).

Now I can wear my lovely boots with all kinds of outfits and minimal ouch-age! 

6.21.2012

Mod Bod | SECOND SKIRT REFASHION

Remember when I showed you these dresses from the thrift store I was going to refashion? Well I finally did something with the second dress and turned it into a casual skirt. My supply of shorts and capris is pretty small, but instead of replacing them, I've decided to opt for skirts and dresses. Let me just say, when the weather gets warm here, it's really great to put on a breezy skirt and feel cute and comfortable.


Anyway, using a pattern I bought at the dollar bin at Wal-Mart, I adjusted just a bit and made this simple skirt. I was able to salvage a pocket from the original dress, which is always a perk. However, it was a mess of about 5 attempts to get the pocket attached. I guess I need to research that particular piecing method more next time. I also chose a contrasting zipper in mint green to mix it up. My Main Man thought it was an "interesting" choice, but I think it's spunky! (Oh- and I chopped my hair! What do you think?)


6.13.2012

Craft Confessions | PASSPORT BOOK

Some of my posts for a while will be related to things I made for my trip to Thailand and Cambodia this spring with my husband and his classmates. Hopefully they're applicable for your traveling OR everyday needs!


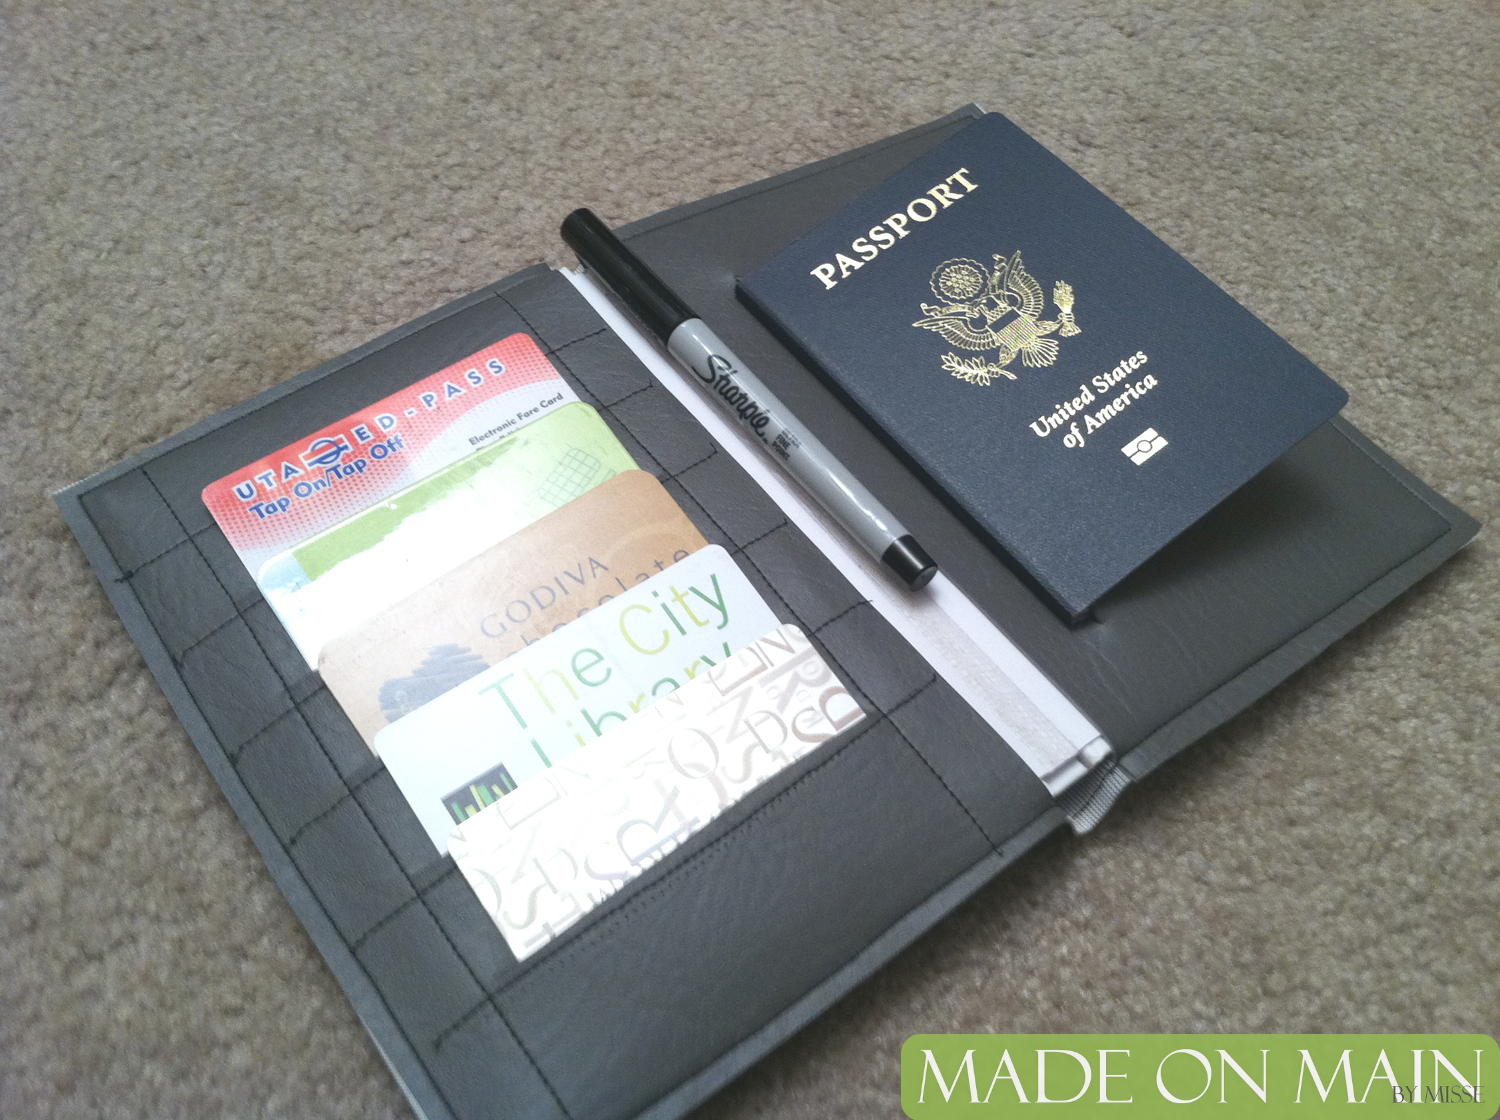
When I travel internationally, I feel like I have so many things to keep track of like my passport, plane tickets, maps, credits cards/cash, ID cards, and so on. My wallet isn't really the perfect size or shape for all of these items, so I made myself a simple passport book for my many checkpoints through Asia.

My materials included a cheap hard cover notebook, grey vinyl, a heavy-duty sewing needle, scrap fabric (for the pockets), and later on I added in a binder clip.


First, I dissected the notebook and pulled out all the paper while maintaining the binding in the center. With the book open, I measured it's perimeter and cut out a piece of vinyl to those dimensions with a bit of wiggle room. I then measured the dimensions of one cover side and cut that out twice (with wiggle room again). I wanted to hold my passport on the right side, so I cut a slit up and down just a bit longer than my passport binding. On the left side, I wanted to hold cards, so I cut multiple strips on top of each other a bit longer than a credit card. To keep the cards in place, I measured a long piece of scrap cloth just wider than a card and as long as the number of cards I wanted to hold * 1.5 (it was really a lot of eye-balling, so you might have to test this out a bit on your own).


I stitched the scrap cloth in an accordion pattern onto the vinyl. I then stitched each pocket side onto the larger piece of vinyl. The pieces kind of moved around, so I trimmed off the excess to even things up. I flipped the hard book cover backwards, and slipped the vinyl sleeve onto it. In addition to the slit for a passport and cards, I could slip maps into the space between the vinyl and book covers. The passport book was complete! However, when I got to Thailand, My Main Man wanted me to keep his passport and other papers with his, so we attached a binder clip to the left side. It turns out that it worked really well and holds plane tickets really well! Good thinking, MMM.


3.16.2012

How to Throw a Winter Party | Decorations!

This week I've been sharing how I put together a "Cozy Winter Social". It was a perfectly fun way to distract myself while my husband was out of town. If you want to see the other stages of putting the party together, check out my posts from the rest of this week!

This week I've been sharing how I put together a "Cozy Winter Social". It was a perfectly fun way to distract myself while my husband was out of town. If you want to see the other stages of putting the party together, check out my posts from the rest of this week!


I saved this post for the end of the week because decorating was ABSOLUTELY my favorite part of this whole party. It managed to occupy the better part of two weeks (which was perfect to keep me busy without My Main Man around).


I was holding the party at night, so I thought it would be perfect to play off of that. I wanted to create the illusion of spending a wintery night out under the stars (let's be honest, the stars look so pretty and bright through a clear winter sky). I draped Christmas lights across the downstairs ceiling and only turned on the light at the top of our stairs (I'll explain why in a moment) and, if necessary, the light in the laundry room (since it's around the corner and only provides indirect light). Anywhere else I needed light, I sprinkled tea lights across the various tables. Again, keeping budget in mind, I needed to be creative to find easy candle-holding solutions, so I scoured my house for glass jars. I used a combination of jelly jars, baby food jars, the lids to those jars (painted white), and a metal tin to create a grouping of candle-light.


Flowers get expensive, and this party was winter-themed anyway, so I grouped some funky-shaped sticks as my "arrangements" at each table. Again, the sticks were free and the glass jars came from food I had already eaten, so they were basically free decorations. Remember when I showed you my super cheap candlesticks a few weeks ago? Well they were originally creme-colored, so I painted a few of them white to match the decor and hot-glued glass gars to a couple of them.

While I was putting together my Valentine banner using cheap felt, I also put together two triangular banners with my party colors. One was draped across the living room, and the smaller one was hung in a "U" shape over the food table to create a central focus.


The final piece to my party decorating was a photo booth at the top of the stairs. I tend to be lame at taking pictures during parties, so I thought a fun photo booth would help me document all of my lovely guests. For the backdrop, I draped a grey sheet across the wall and pinned various twine and long jewelry over the sheet. To make it fun, I set up a table with props including winter accessories and a dry-erase sign to write messages.

Check out yesterday's post to find out more about these super cool women. (Cousin-in-Law, Winter, The Rocker, Share-and-Tell, Half-Rich, and more!)
To tie everything together, I used ribbons, twine, and some grey strips as decoration. By keeping to a simple color and material palette, everything tied together well and I was so happy with how my decorations turned out!

This finishes up my week on throwing a winter party. I'm still vacationing, so I may not get right back into the swing of things next week, but I promise I'll be back ASAP!

2.24.2012

Craft Confessions | Hoot the Owl

Remember how owls were super cool a year ago? Well, being the stubborn, anti-faddist that I am, I wasn't really into them. Then I decided to throw a little winter bash, and I realized snow owls really did personify winter quite perfectly. So I caved. But let's be honest, these guys turned out really cute.


Here's how to create your own little Hoot.

1. Print out this template to cut out felt pieces. (I made mine on a piece of 8.5" x 11" paper folded in half.)


2. Place the template on a folded piece of felt and cut out the owl's body. Then place the template on a smaller, contrasting piece of felt to cut out the belly of the owl. The other pieces (beak, pupils, and irises) can be free-handed a bit, but the template shows how I chose to cut them out. I wanted to give a fun expression to my Hoot, so I played around with the placement of his pupils a bit.


3. To attach the various pieces to the owls, use a bit of tacky glue to temporarily attach the pieces. For the belly, beak, and irises, use a coordinating zig-zag stitch. For the pupils, I chose to use a simple dashed stitch so that the eyes wouldn't look too crazy. I also decided to throw in a cute little heart on the owls' bums. You know, just to share the love.


4. At this stage, you can go one of two directions. If  you want Hoot to be more of a pillow, then just sew the two pieces right-sides together, leaving a 4-inch opening at the bottom. If you want Hoot to stand on his own, leave the opening alone one of his sides. Then pinch the bottom corners together and sew across the corners at 45 degree angles to make the owl become three dimensional.


5. Flip your little owls right-side-out, stuff them up, and use an invisible/whip-stitch to close your guys up.


(6. Fall in love. I really wasn't into this owl thing before, but aren't these cute?)

1.27.2012

Mod Bod | Winter Coat Fix


Winter finally decided to make an appearance in Utah, and all I can say is "Finally!" The only downside to finally getting our due share of snow was that I really needed to give my pea coat a minor face-lift. I bought my coat three winters ago, and due to my passionate affair with this particular piece of outerwear, I had managed to rub holes in the edges of each sleeve. As eager as I may be to sew a new coat completely from scratch, such a project wasn't in my budget, and I couldn't imagine parting with a coat that still had so many years of good use left in it.


I grabbed 6" of a wool outerwear blend from my local JoAnn's (and yes, I did happen to feel very weird asking for only 6"). The plaid pattern has a little hint of shiny silver in it, which really made me excited to add a bit of spice to my conservative coat. I then sewed a cuff to attach to each sleeve. For each cuff I cut out a piece 6" thick (to get 2" cuffs eventually) with a width one inch more than the circumference of my sleeve. I then folded each cuff in half and sewed the ends together with a 1/2" seam allowance.


I inserted the cuff into the sleeve, with the edge of the sleeve and edge of the cuff lining up, and hand-sewed about 1/2" down from the edge of the sleeve all around. I then pulled the cuff up/out and folded the remaining raw edge down by 1/2" and pinned the edges down. I then folded this entire piece over the outside of the sleeve. To finish the cuff, I used an invisible stitch all the way around. 


The project took a bit because it all had to be sewn by hand, but a little under an hour to revamp a coat versus days to build a new coat seems worth the time! I have one pressing question, though: how in the world does one pose for self-portraits? I am definitely camera shy if I'm not being goofy, and I end up with weird poses like this one below and my funky semi-robot at the top. Sorry for my non-model-isticity. 


1.20.2012

Sew Awesome | Things I've Learned #1


Remember how I mentioned in my new year resolutions that I was going to be more honest about the times I've screwed up? Well here you go. I'm going to be honest and fess up to the fact that I totally took the easy way out (mostly for financial reasons) on a project, and the lesson learned.

Lesson #1: Use the type of fabric called for in your pattern!


I needed a new purse, and I had a brand new sewing machine, so I decided to conquer this lovely pattern offered by Sew Mama Sew. (I hope a few of you decide to also make the purse this instant; it's quite a great organizer and stuff-holder.) Although the pattern clearly specifies mid-weight home decor fabric, I decided that I really wanted the cheaper cost and pattern availability afforded by quilting-quality cotton. You know, the stuff found in 90% of Wal-Mart's fabric selection or the first ten aisles at JoAnn's.  I realized fairly quickly that this substitution would give my bag a much less rigid shape than the models in the instructions, but I couldn't turn back at that point.

Unfortunately, after about three months of use, my handles just weren't cutting it. The seams had torn open at the point where my shoulder supports the bag, and all the nastiness of the stabilizer (and the paper backing I had forgotten to remove) were spilling out. It was a mess, to say the least. So I picked up my shattered pride, bought a single foot of solid black home decor fabric, and redid my shoulder straps. I've got a lot of hope for these babies. Not only are they thicker and more durable, but if they do start to rag, the fabric is dyed black the whole way through, so I won't be showing off the ugly wrong side of the straps to anyone.


So let this be a lesson to all you short-cutters out there. Sometimes, you just need to buck up and buy the correct (sometimes more expensive) fabric to get a piece that will really work!

12.27.2011

Mod Bod | Refashion #1 Finished!

Yes, it's true! After about six weeks, many scary sewing machine sounds, and a few frustrated blow-ups, my first dress refashion is done, and I am in love! Remember when I showed you here the less-than-lovely dresses I bought at a thrift store? Well I started with the navy number and clipped away to make a cute, form-fitting dress out of it. I was trying to channel a little Jackie O and a little PanAm's Christina Ricci. I started taking process pictures, but after a few weeks I realized I just needed to get on with the sewing and not waste time picture-taking. Let me tell you one thing, though, I will majorly avoid working with spandex-polyester-stretchy fabric in the future. My sewing machine was not a fan!

Here's the before (please excuse the blurriness- I was still learning how to harness the power of the tripod!):


My single process picture:


And here's my much-anticipated after (I'm obviously not a model, and the red bracelet was to make me feel Christmas-y):


What do you think?

12.23.2011

Sew Awesome | Booty Bag From A Freebie!

Hey friends! I'm back, and I have a quick, last-minute, and budget-friendly gift option to share with you! Don't you hate getting those awful free bags/totes at conferences? I hate them because (1) I have plenty of plain canvas totes cluttering up my closet already and (2) I don't feel the need to carry around every sponsor's logo which is tastelessly plastered across the front of my bag. It's just a waste, right? Wrong!


As in many obnoxiously large families (I'm the oldest of seven), we draw names for Christmas gifts. This year, I was excited to be chosen to give a gift to Seven of Seven (my parents weren't mean enough to name him that, I just use nicknames for all my friends and family here). He may be the cutest 4-year-old on the entire planet.

Since he's such a mature pre-k attender, I felt he could really use a fun bag to carry his big boy belongings. Thus, I converted a nasty, logo-smeared shoulder bag into a handy-dandy booty bag!  

I found a really cute pirate print at JoAnn's fabric (and, of course, I used a 50% off coupon) and bought just two yards. To cover up one side of the bag, I attached a very (un)detailed map to a buried treasure. On the other side, I attached a name badge and a couple of small pockets (they're about the size to hold some crayons or hotwheels). With the leftover fabric, I made Seven of Seven a very masculine doo-rag and matching vest so he can look especially fearsome should the mood hit him. It may not be my best craftsmanship, but I really think he'll enjoy it :). Merry Christmas little Seven!